மலச்சிக்கல் மற்றும் வயிற்றுப்போக்கு போன்றவற்றிற்கும் தயிர்தான் சிறந்த மருந்து.
உணவை ஜீரணிக்க தயிர் உதவுவதோடு மட்டுமல்லாமல் வயிற்றின் வாயுத்தொல்லையிலிருந்தும் விடுவிக்கிறது.
குடலில் சதை வளரும் `அப்பண்டிசைடிஸ்' மற்றும் வயிற்றுப் போக்கு போன்றவற்றிற்கு காரணமாக இருக்கும் கிருமிகள் தயிர், மோர் இவற்றில் உள்ள லேக்டிக் அமிலத்தால் விரட்டியக்கப்படும்.
ஒரு கை நிறைய தயிரை எடுத்து தலையில் நன்றாக தேய்த்தால் தூக்கம் நன்றாக வரும்
Thursday, April 23, 2009
How To Double Firefox Speed
Some Tips&Tricks that can help you double the speed of Firefox.
1. Type about:config in the address bar and then press Enter.
2. In the filter search bar type network.http.pipelining. Be sure the value field is set true,if not double-click to set true. HTTP is the application-layer protocol that most web pages are transferred with. In HTTP 1.1, multiple requests can be sent before any responses are received. This is known as pipelining. Pipelining reduces page loading times, but not all servers support it.
3. Go back to the filter search bar and type network.http.pipelining.maxrequests Double-click this option and set its value to 8.
4. In the filter search bar and type network.http.proxy.pipelining. Once opened doubleclick on it and set it to true.
5. In IPv6-capable DNS servers, an IPv4 address may be returned when an IPv6 address is requested. It is possible for Mozilla to recover from this misinformation, but a significant delay is introduced.
Type network.dns.disableIPv6 in the filter search bar and set this option to true by double clicking on it.
6. CONTENT INTERRUPT PARSING
This preference controls if the application will interrupt parsing a page to respond to UI events. It does not exist by default. Right-click (Apple users ctrl-click) anywhere in the about:config window, select New and then Boolean from the pop-up menu. Then:
A. Enter content.interrupt.parsing in the New boolean value pop-up window and click OK
B. When prompted to choose the value for the new boolean, select true and click OK.
7. Rather than wait until a page has completely downloaded to display it to the user, Mozilla applications will regularly render what has been received to that point. This option controls the maximum amount of time the application will be unresponsive while rendering pages. Right-click (Apple users ctrl-click) anywhere in the about:config window, select New and then Integer from the pop-up menu.
A. Enter content.max.tokenizing.time in the New integer value pop-up window and click OK
B. You will be prompted to enter a value. Enter 2250000 and click OK.
8. CONTENT NOTIFY INTERVAL
This option sets the minimum amount of time to wait between reflows. Right-click (Apple users ctrl-click) anywhere in the about:config window, select New and then Integer from the pop-up menu.
A. Type content.notify.interval in the New integer value pop-up window and click OK.
B. You will be prompted to enter a value. Enter 750000 and click OK.
9. CONTENT NOTIFY ONTIMER
A. This option sets if to reflow pages at an interval any higher than that specified by content.notify.interval. Right-click (Apple users ctrl-click) anywhere in the about:config window and select New and then Boolean from the pop-up menu.
B. Type content.notify.ontimer in the New boolean value pop-up window and click OK.
C. You will be prompted to choose the value for the new boolean. Select true and click OK.
10. Notify Backoffcount
This option controls the maximum number of times the content will do timer-based reflows. After this number has been reached, the page will only reflow once it is finished downloading. Right-click (Apple users ctrl-click) anywhere in the about:config window and select New and then Integer from the pop-up menu.
A. Enter content.notify.backoffcount in the New integer value pop-up window and click OK.
B. You will be prompted to enter a value. Enter 5 and click OK.
11. CONTENT SWITCH THRESHOLD
You can interact with a loading page when content.interrupt.parsing is set to true. When a page is loading, the application has two modes: a high frequency interrupt mode and a low frequency interrupt mode. The first one interrupts the parser more frequently to allow for greater UI responsiveness during page load.
The low frequency interrupt mode interrupts the parser less frequently to allow for quicker page load. The application enters high frequency interrupt mode when you move the mouse or type on the keyboard and switch back to low frequency mode when you had no activity for a certain amount of time. This preference controls that amount of time. Right-click (Apple users ctrl-click) anywhere in the about:config window and select New and then Integer from the pop-up menu.
A. Enter content.switch.threshold in the New integer value pop-up window and click OK.
B. You will be prompted to enter a value. Enter 750000 and click OK.
12. NGLAYOUT INITIALPAINT DELAY
Mozilla applications render web pages incrementally, they display what’s been received
of a page before the entire page has been downloaded. Since the start of a web page
normally doesn’t have much useful information to display, Mozilla applications will wait
a short interval before first rendering a page. This preference controls that interval. Rightclick (Apple users ctrl-click) anywhere in the about:config window and select New and then Integer from the pop-up menu.
A. Enter nglayout.initialpaint.delay in the New integer value pop-up window and click OK.
B. You will be prompted to enter a value. Enter 0 and click OK.
Sunday, April 19, 2009
Tweak Windows Vista's Logon screen to meet your needs
Before you begin editing, keep in mind that the Windows Registry is vital to the operating system. Before editing the Windows Registry, you should take a few moments to back it up for safekeeping.
To begin, click the Start button, type Regedit in the Start Search box, and then press [Enter]. When you do, you’ll encounter a UAC and will need to respond accordingly.
Once the Registry Editor launches, locate the following key:
HKEY_LOCAL_MACHINE\SOFTWARE\Microsoft\Windows\CurrentVersion\Policies\System
From this key, you’ll be able to make all the following changes to the Logon screen.
Removing the shutdown button
When you are viewing the Vista Logon screen, you’ll notice that there is a red shutdown button on the lower right part of the screen, as shown in Figure A.
Figure A
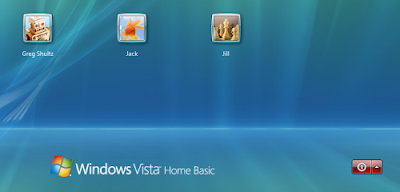 There’s a large, red shutdown button on the lower right part of the Logon screen.
To remove the shutdown button from the Logon screen, locate and double-click the shutdownwithoutlogon value. When the Edit DWORD dialog box appears, simply type 0 in the Value Data text box, as shown in Figure B, and click OK.
Figure B
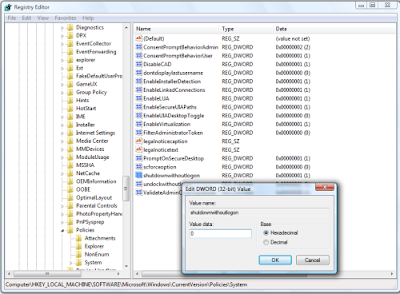 To remove the shutdown button from the Logon screen, set the shutdown without logon value to 0.
The next time you see the Logon screen you’ll notice that the red shutdown button is gone, as shown in Figure C.
Figure C
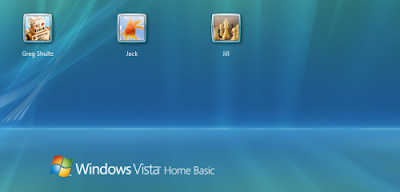 The large, red shutdown button is gone.
(Now, if I could only figure out a way to remove the Ease of Access button from the Logon screen. Any ideas?)
Adding a legal notice to the Logon screen
If you want to back up the Vista Logon security system, you may want to add a warning message to the screen that is designed to act as a deterrent to anyone thinking of attempting unauthorized access. While this type of measure doesn’t add any real protection to the system, it might be all that’s needed to prevent an unauthorized user from proceeding.
To add a title to the warning message, locate and double-click the legalnoticecaption value. When the Edit DWORD dialog box appears, type the title in the Value Data text box, as shown in Figure D, and click OK.
Figure D
 The legalnoticecaption value allows you to specify a title for your warning message.
To add the warning message, locate and double-click the legalnoticetext value. When the Edit DWORD dialog box appears, type the warning message in the Value Data text box, as shown in Figure E, and click OK.
Figure E
 You can type a lot of text into the legalnoticetext value.
Now when you access the Logon screen, you’ll see your warning message. Just click OK and you’ll see your user icon and can continue with the logon operation.To begin, click the Start button, type Regedit in the Start Search box, and then press [Enter]. When you do, you’ll encounter a UAC and will need to respond accordingly.
Once the Registry Editor launches, locate the following key:
HKEY_LOCAL_MACHINE\SOFTWARE\Microsoft\Windows\CurrentVersion\Policies\System
From this key, you’ll be able to make all the following changes to the Logon screen.
Removing the shutdown button
When you are viewing the Vista Logon screen, you’ll notice that there is a red shutdown button on the lower right part of the screen, as shown in Figure A.
Figure A
 There’s a large, red shutdown button on the lower right part of the Logon screen.
To remove the shutdown button from the Logon screen, locate and double-click the shutdownwithoutlogon value. When the Edit DWORD dialog box appears, simply type 0 in the Value Data text box, as shown in Figure B, and click OK.
Figure B
 To remove the shutdown button from the Logon screen, set the shutdown without logon value to 0.
The next time you see the Logon screen you’ll notice that the red shutdown button is gone, as shown in Figure C.
Figure C
 The large, red shutdown button is gone.
(Now, if I could only figure out a way to remove the Ease of Access button from the Logon screen. Any ideas?)
Adding a legal notice to the Logon screen
If you want to back up the Vista Logon security system, you may want to add a warning message to the screen that is designed to act as a deterrent to anyone thinking of attempting unauthorized access. While this type of measure doesn’t add any real protection to the system, it might be all that’s needed to prevent an unauthorized user from proceeding.
To add a title to the warning message, locate and double-click the legalnoticecaption value. When the Edit DWORD dialog box appears, type the title in the Value Data text box, as shown in Figure D, and click OK.
Figure D
 The legalnoticecaption value allows you to specify a title for your warning message.
To add the warning message, locate and double-click the legalnoticetext value. When the Edit DWORD dialog box appears, type the warning message in the Value Data text box, as shown in Figure E, and click OK.
Figure E
 You can type a lot of text into the legalnoticetext value.
Tracking logons
If you want to be able to keep track of logons that were made on your system, you can configure the Logon screen to display logon statistics. Right-click anywhere inside the System key and select New | DWORD (32-bit) Value. When the new value appears, type DisplayLastLogonInfo and then press Enter twice. When the Edit DWORD dialog box appears, simply type 1 in the Value Data text box, as shown in Figure F, and click OK.
Figure F
 If you want to be able to keep track of logons that were made on your system, set the DisplayLastLogonInfo value to 1.
Now when you select your user icon on the Logon screen, you’ll see the logon statistics, as shown in Figure G. Just click OK to complete the logon operation.
Figure G
 After you click your user icon, you’ll see the logon statistics on the Logon screen.
Rein in the unbound storage appetite of Vista System Restore
I recently noticed that the hard disk on one of the Microsoft Windows Vista test systems that I use quite regularly began to fill up. This seemed odd to me because while I have a lot of data on the disk, the majority of it just test data (i.e. data that I copy over from my real system just so I have something to work with). I don’t really generate much, if any, data on that system. As such, I was a bit confused as to where all the disk space was going.
Using My Computer and a couple of third-party disk space analyzers just for good measure, I discovered that I could not reconcile the disk space usage. The system has a 120GB hard disk in it, and I could account for only about 80GB of data and installed applications. So why was the system displaying a low disk space warning message?
I immediately ran the Disk Cleanup tool and set about emptying and removing just about anything that could be using up disk space: the Recycle Bin, temporary Internet files, dump files, thumbnails, log files, temp files, error report files, and downloaded program files.
That seemed to help for a while, but the problem cropped up again.
After a bit more investigation, I discovered that the problem was being caused by a configuration problem with Vista’s System Restore feature.
In this edition of the Microsoft Windows Vista & Windows 7 Report, I’ll show you what I discovered and how you can fix it. As I do, I’ll also explain how to use the Volume Shadow Copy Service Administration command-line tool, VSSAdmin.
How System Restore works
Before we get started on the technique, let’s begin with a brief overview of how System Restore works.
System Restore is designed to take snapshots, called restore points, of your system state before certain types of operations, such as installing new drivers or installing Windows updates, are initiated. That way if a problem results from those types of operations, you can revert back to the restore point and essentially recover, or restore, your system to the state that it was in before the problem occurred.
These snapshots are taken by the Volume Shadow Copy Service. In addition to taking care of creating the restore points, the Volume Shadow Copy Service also monitors data files for the Previous Versions feature.
Using VSSAdmin
In order to manage the Volume Shadow Copy Service and ultimately System Restore, you’ll use the VSSAdmin command-line tool — there is no GUI tool in Vista for configuring System Restore. In order to run VSSAdmin, you must launch an elevated Command Prompt window.
To begin, right-click on the Command Prompt shortcut and select the Run as Administrator command. When you encounter the UAC, you will need to respond appropriately.
You can now use the VSSAdmin command-line tool to investigate and configure System Restore and the Shadow Copy Service. For example, you can obtain a list of all the restore points currently saved on the system by using the command:
vssadmin list shadows
You can see how much disk space is allocated to and used by System Restore and the Shadow Copy Service system by using the command:
vssadmin list shadowstorage
The investigation
On the Vista system that was running out of disk space, the result of the vssadmin list shadowstorage command is shown in Figure A. As you can see the Maximum Shadow Copy Storage space settings was set to Unbounded, which means that there is no limit to the size it can grow and it was already at 40GB.
Figure A
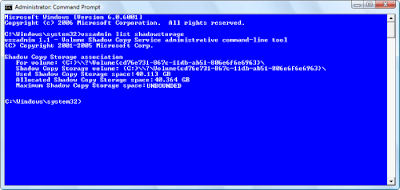 The Maximum Shadow Copy Storage space setting on the problem system was set to Unbounded.
On another Vista test system, running on an 80MB hard disk, the Maximum Shadow Copy Storage space setting was set to 11 GB, as shown in Figure B. This was a much more reasonable value. Why the value on one of my test systems was set to unbounded while the others had specific maximum values, I’m not sure.
Figure B


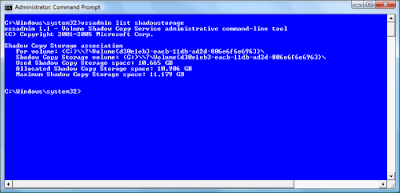 The Maximum Shadow Copy Storage space setting on another system was set to 11GB.
The solution
You can reset the value of the Maximum Shadow Copy Storage space setting using the command:
vssadmin resize shadowstorage /for= /on= [/maxsize=
On my problem system, I reset the Maximum Shadow Copy Storage space setting to 15GB using the command:
vssadmin resize shadowstorage /for=c: /on=c: /maxsize=15GB
Once the operation was complete, I restarted the system, and everything has been running normally since.
Using My Computer and a couple of third-party disk space analyzers just for good measure, I discovered that I could not reconcile the disk space usage. The system has a 120GB hard disk in it, and I could account for only about 80GB of data and installed applications. So why was the system displaying a low disk space warning message?
I immediately ran the Disk Cleanup tool and set about emptying and removing just about anything that could be using up disk space: the Recycle Bin, temporary Internet files, dump files, thumbnails, log files, temp files, error report files, and downloaded program files.
That seemed to help for a while, but the problem cropped up again.
After a bit more investigation, I discovered that the problem was being caused by a configuration problem with Vista’s System Restore feature.
In this edition of the Microsoft Windows Vista & Windows 7 Report, I’ll show you what I discovered and how you can fix it. As I do, I’ll also explain how to use the Volume Shadow Copy Service Administration command-line tool, VSSAdmin.
How System Restore works
Before we get started on the technique, let’s begin with a brief overview of how System Restore works.
System Restore is designed to take snapshots, called restore points, of your system state before certain types of operations, such as installing new drivers or installing Windows updates, are initiated. That way if a problem results from those types of operations, you can revert back to the restore point and essentially recover, or restore, your system to the state that it was in before the problem occurred.
These snapshots are taken by the Volume Shadow Copy Service. In addition to taking care of creating the restore points, the Volume Shadow Copy Service also monitors data files for the Previous Versions feature.
Using VSSAdmin
In order to manage the Volume Shadow Copy Service and ultimately System Restore, you’ll use the VSSAdmin command-line tool — there is no GUI tool in Vista for configuring System Restore. In order to run VSSAdmin, you must launch an elevated Command Prompt window.
To begin, right-click on the Command Prompt shortcut and select the Run as Administrator command. When you encounter the UAC, you will need to respond appropriately.
You can now use the VSSAdmin command-line tool to investigate and configure System Restore and the Shadow Copy Service. For example, you can obtain a list of all the restore points currently saved on the system by using the command:
vssadmin list shadows
You can see how much disk space is allocated to and used by System Restore and the Shadow Copy Service system by using the command:
vssadmin list shadowstorage
The investigation
On the Vista system that was running out of disk space, the result of the vssadmin list shadowstorage command is shown in Figure A. As you can see the Maximum Shadow Copy Storage space settings was set to Unbounded, which means that there is no limit to the size it can grow and it was already at 40GB.
Figure A
 The Maximum Shadow Copy Storage space setting on the problem system was set to Unbounded.
On another Vista test system, running on an 80MB hard disk, the Maximum Shadow Copy Storage space setting was set to 11 GB, as shown in Figure B. This was a much more reasonable value. Why the value on one of my test systems was set to unbounded while the others had specific maximum values, I’m not sure.
Figure B
 The Maximum Shadow Copy Storage space setting on another system was set to 11GB.
The solution
You can reset the value of the Maximum Shadow Copy Storage space setting using the command:
vssadmin resize shadowstorage /for=
On my problem system, I reset the Maximum Shadow Copy Storage space setting to 15GB using the command:
vssadmin resize shadowstorage /for=c: /on=c: /maxsize=15GB
Once the operation was complete, I restarted the system, and everything has been running normally since.
Subscribe to:
Posts (Atom)