Command
|
Command line
|
| Restart | Shutdown -r -f -t 00 |
| Shut Down | Shutdown -s -f -t 00 |
| Hybrid Shut Down | Shutdown -s -f -t 00 -hybrid |
| Sleep | Rundll32.exe powrprof.dll,SetSuspendState Sleep |
| Hibernate | Shutdown -h |
| Lock | Rundll32 User32.dll,LockWorkStation |
| Sign Off | Shutdown -l |
| Switch Users | Tsdiscon.exe |
Showing posts with label Windows Tips. Show all posts
Showing posts with label Windows Tips. Show all posts
Tuesday, June 11, 2013
Shut down Windows using cmd line
Friday, May 17, 2013
Internal SATA drives are treated as removable drives - Solution
This is happening because Windows 7 added support for eSATA
functionality. Some hardware vendors have incorrectly configured all
SATA ports as eSATA ports. This causes all internal and external SATA
devices to be treated as removable. This issue can affect
hard disks, DVD drives, and other hardware attached to the internal
SATA ports of the system.
This issue can be ignored because it does not have an effect on your computer. To resolve this issue you should contact the computer manufacturer for a BIOS update or other type of resolution to correct the misconfiguration of the internal SATA ports.
To work around the issue, a registry key can be set to change the behavior of the SATA ports.
Adding the TreatAsInternalPort value and setting it to 1 will cause a SATA port to be treated as an internal port and attached devices will no longer be considered removable. This value can be applied to specific ports as needed. To do this, follow these steps:
1. Click Start
2. In the Search programs and files box, type command
3. In the Programs list, click Command Prompt and click Run as administrator
If you are prompted for an administrator password or confirmation, type the password or click Continue.
4. Copy and paste or type each of the commands into the command prompt and press Enter after each command
reg.exe add "HKLM\SYSTEM\CurrentControlSet\Services\msahci\Controller0\Channel0" /f /v TreatAsInternalPort /t REG_DWORD /d 0x00000001
reg.exe add "HKLM\SYSTEM\CurrentControlSet\Services\msahci\Controller0\Channel1" /f /v TreatAsInternalPort /t REG_DWORD /d 0x00000001
5. Restart your computer to enable the registry changes
Note: There may be some trial and error to determine the correct ports (also referred to as "channels").
The channel numbers shown in Device Manager may not match the channel number in the registry, so you may need to set the value and verify the desired effect.
Sunday, March 31, 2013
How To Enable Windows 8 Hibernate Option
Windows 8 has come with a lot of changes which users are finding a
bit annoying and the Hibernation option is not visible by default,
however, if you can’t find Hibernate option in the Start menu power
button, the steps to enable Hibernate shortcuts in Windows 8 is easy.
Hibernation is a feature of an operating system which allows the
contents of RAM to be written to the hard drive, so that can allows
system to quickly restart and restore to original state when hibernation
was invoked.

Here How to Enable Hibernate in Windows 8
Here How to Enable Hibernate in Windows 8
- Open RUN dialog box by press “WIN+R” key, and then type powercfg.cpl and press Enter to open pwer options windows.
Or, click battery icon in system tray and then select More power options.
- Now select on “Choose what the power buttons do” option link given in left sidebar.
- Then click on “Change settings that are currently unavailable“.
- In the system setting windows, enable the Hibernation option by check Show Hibernate option.
- Click Save Changes button when done.
- Hibernation option will now be show and can be accessed from Charms Bar.


Thursday, February 2, 2012
Repair and Reset Windows Vista TCP/IP Winsock Catalog Corruption
TCP/IP stack Winsock settings in Windows Vista may get corrupted, causing errors and problems with Internet connectivity. Corrupt Winsock or Windows sockets configuration can be due to a lot of reasons such as installation of a networking software, or due to virus, trojan or malware infection, or sometime even due to disinfection of spyware by security software.
When Winsock corrupts, the networking errors that you may face include unable to surf the Internet with “Page cannot be displayed” error message in Internet Explorer or AOL even though the DSL/ADSL/cable Internet connection is connected. Sometimes, Windows Firewall/Internet Connection Sharing (ICS) service is terminated as well.
To repair and reset the Windows Vista
- Click on Start button.
- Type Cmd in the Start Search text box.
- Press Ctrl-Shift-Enter keyboard shortcut to run Command Prompt as Administrator. Allow elevation request.
- Type netsh winsock reset in the Command Prompt shell, and then press the Enter key.
- Restart the computer.
What netsh winsock reset command does are it resets Winsock Catalog to a clean state or default configuration. It removes all Winsock LSP (Layered Service Providers) previously installed, including the potential malfunctioned LSP that causes loss of network packets transmission failure. So all previously-installed LSPs must be reinstalled. This command does not affect Winsock Name Space Provider entries.
Note: To check which LSPs installed on your Vista system, use netsh winsock show catalog command.
Wednesday, February 2, 2011
Speed up menus in Windows 7
Speedy menus
Follow these steps to speed up menu display in Windows 7. In the Start Menu Search box type the word “regedit” and click the regedit.exe entry. (Figure A)
Figure A

Start the registry editor
Under the HKEY_CURRENT_USER hive, navigate to this key:Computer\HKEY_CURRENT_USER\Control Panel\Desktop
In the right-hand pane, look for the MenuShowDelay item. (Figure B)
Figure B

MenuShowDelay item
Right-click on the MenuShowDelay item and select the Modify option in the context menu. (Figure C)
Figure C

Click Modify
You can now change the value in the Edit String dialog box to a number lower than the default 400. (Figure D)Warning, don’t go crazy and make the value zero or otherwise extraordinarily low because it could make navigating Windows impossible. A better value would be around 100.

Figure D

Change default value
Thursday, October 21, 2010
Reveal Typecast Passwords in Firefox and Internet Explorer
Many times we need to see passwords behind asterisk or dot symbols in firefox and IE,which were typed just before.
There exist a simple javascript hack to achieve this.
Simply copy-paste the below code snippet into your web browser address bar to see what's inside the password field.
There exist a simple javascript hack to achieve this.
Simply copy-paste the below code snippet into your web browser address bar to see what's inside the password field.
For fast & easy access create a new bookmark and paste the above code in location field, now you can easily access the password on any hidden field by simple using this bookmark.
Wednesday, August 19, 2009
Configure a USB flash drive to be a Windows 7 installation platform
In order to employ this technique you’ll need a USB flash drive that is big enough to hold the contents of the Windows 7 DVD. The Windows 7 RC DVD is about 2.5GB and you can expect that the RTM DVD to be at least that if not more. For my test system I am using a 4GB USB flash drive.
Keep in mind that the procedure we will use will completely reformat the USB flash drive. So you want to make sure that you backup any data that you have on the drive before you begin.
The systems on which you want to install Windows 7 via the USB flash drive have to be able to be configured to boot from a USB drive. Most new systems have the capability to boot from a USB flash drive and the operation can usually be configured in the BIOS or by simply pressing a certain key during boot up. You’ll need to check your specific hardware in order to be sure.
Using the DiskPart utility
As you may know, the DiskPart utility is a command line version of the Disk Management snap-in and is designed to allow you to manage disks, partitions, or volumes from within scripts or directly from a command prompt. We can use the DiskPart command to configure a USB flash drive to be a bootable device. Let’s take a closer look.
To begin, connect your USB flash drive to a computer on which you will be preparing the drive. For my example, I’ll be using a Windows Vista system.
Now, locate the command Prompt shortcut on the Start menu, right click on it, and select the Run as administrator command. Then, respond appropriately to the UAC. You can now launch the DiskPart utility by typing DiskPart on the command line. You’ll then see the DISKPART prompt, as shown in Figure A.
Figure A

DiskPart has its own command line environment complete with a special prompt.
Now that you’re in the DiskPart environment, you’ll need to locate the USB flash drive using the List Disk command. As you can see in Figure B, the List Disk command has identified my USB flash drive as Disk 5. I can verify that my USB flash drive is indeed Disk 5 by checking the Size column, which lists the size as 3906MB, which is roughly 4GB.
Figure B

Using the List Disk command displays all the disks in the system.
(If you have difficulty identifying your USB flash drive using the List Disk command, you can try the List Volume command, which will provide the drive letter as well as the label, both of which can help you to identify the drive.)
Once you identify the drive number of your USB flash drive, you will need to set the focus of the DiskPart environment on that disk. On my example, the USB flash drive is Disk 5, so I will use the command Select Disk 5, as shown in Figure C.
Figure C

To shift the focus over to the USB flash drive you’ll use the Select Disk command.
Now that your USB flash drive has the focus, you need to remove all the partition or volume formatting information from the disk. To do that, you’ll use the Clean command. The Clean operation should occur rather quickly. When it is done you will see a success message like the one shown in Figure D.
Figure D

In order to start with a clean slate you’ll use the Clean command to remove all partition and volume information from the USB flash drive.
You’ll now use the Create Partition Primary command to create a primary partition on the disk. After you create the partition, you will see a success message and the focus automatically shifts to the new partition. You’ll use the Active command to mark the partition as active, as shown in Figure E. Marking the partition as active will essentially allow the BIOS to recognize that the partition is a valid bootable system partition.
Figure E

Using the Create Partition Primary and the Active commands, you’ll create a bootable partition on the USB flash drive.
With the partition created and active, you’re now ready to quick format the drive and set up the FAT32 file system using the Format fs=FAT32 quick command. (While you could format the drive as NTFS, the typical way to format a USB flash drive is to use FAT32.) Once the drive is formatted, you’ll use the Assign command, as shown in Figure F, to allow the drive to be assigned a drive letter.
Figure F

To complete the preparation, you’ll format the drive and assign it a drive letter.
The USB flash drive is now ready. At this point, you can use the Exit command to exit the DiskPart environment and then close the Command Prompt window.
Copying the Windows 7 files
Copying the Windows 7 files is easy. Just open Windows Explorer, access the Windows 7 DVD, select all the files and folders, and then drag and drop them on the USB flash drive icon, as shown in Figure G. Keep in mind that the copy operation will take a little while to complete.
Figure G

Once the USB flash drive is ready to go, you can copy all the files and folders from the Windows 7 DVD to the newly prepared bootable drive.
Installing Windows 7 from the USB flash drive
With the contents of the Windows 7 DVD on a bootable USB flash drive, installing the operating system is a snap. Just boot the system from the USB drive and the installation procedure will begin as it normally would as shown in Figure H. However, the installation procedure will actually run quicker off of a USB flash drive since it doesn’t contain any physical moving components.
Figure H

Once the system boots from the USB flash drive, the Windows 7 installation will begin as normal, but it will actually run faster.
Saturday, July 4, 2009
How to remove shortcut arrows from desktop icons in Windows XP
Just follow the simple steps below to remove the arrow:
1. Start regedit.
2. Navigate to HKEY_CLASSES_ROOT/lnkfile
3. Delete the IsShortcut registry value.
You may need to restart Windows XP for the changes to take affect.
1. Start regedit.
2. Navigate to HKEY_CLASSES_ROOT/lnkfile
3. Delete the IsShortcut registry value.
You may need to restart Windows XP for the changes to take affect.
Thursday, April 23, 2009
How To Double Firefox Speed
Some Tips&Tricks that can help you double the speed of Firefox.
1. Type about:config in the address bar and then press Enter.
2. In the filter search bar type network.http.pipelining. Be sure the value field is set true,if not double-click to set true. HTTP is the application-layer protocol that most web pages are transferred with. In HTTP 1.1, multiple requests can be sent before any responses are received. This is known as pipelining. Pipelining reduces page loading times, but not all servers support it.
3. Go back to the filter search bar and type network.http.pipelining.maxrequests Double-click this option and set its value to 8.
4. In the filter search bar and type network.http.proxy.pipelining. Once opened doubleclick on it and set it to true.
5. In IPv6-capable DNS servers, an IPv4 address may be returned when an IPv6 address is requested. It is possible for Mozilla to recover from this misinformation, but a significant delay is introduced.
Type network.dns.disableIPv6 in the filter search bar and set this option to true by double clicking on it.
6. CONTENT INTERRUPT PARSING
This preference controls if the application will interrupt parsing a page to respond to UI events. It does not exist by default. Right-click (Apple users ctrl-click) anywhere in the about:config window, select New and then Boolean from the pop-up menu. Then:
A. Enter content.interrupt.parsing in the New boolean value pop-up window and click OK
B. When prompted to choose the value for the new boolean, select true and click OK.
7. Rather than wait until a page has completely downloaded to display it to the user, Mozilla applications will regularly render what has been received to that point. This option controls the maximum amount of time the application will be unresponsive while rendering pages. Right-click (Apple users ctrl-click) anywhere in the about:config window, select New and then Integer from the pop-up menu.
A. Enter content.max.tokenizing.time in the New integer value pop-up window and click OK
B. You will be prompted to enter a value. Enter 2250000 and click OK.
8. CONTENT NOTIFY INTERVAL
This option sets the minimum amount of time to wait between reflows. Right-click (Apple users ctrl-click) anywhere in the about:config window, select New and then Integer from the pop-up menu.
A. Type content.notify.interval in the New integer value pop-up window and click OK.
B. You will be prompted to enter a value. Enter 750000 and click OK.
9. CONTENT NOTIFY ONTIMER
A. This option sets if to reflow pages at an interval any higher than that specified by content.notify.interval. Right-click (Apple users ctrl-click) anywhere in the about:config window and select New and then Boolean from the pop-up menu.
B. Type content.notify.ontimer in the New boolean value pop-up window and click OK.
C. You will be prompted to choose the value for the new boolean. Select true and click OK.
10. Notify Backoffcount
This option controls the maximum number of times the content will do timer-based reflows. After this number has been reached, the page will only reflow once it is finished downloading. Right-click (Apple users ctrl-click) anywhere in the about:config window and select New and then Integer from the pop-up menu.
A. Enter content.notify.backoffcount in the New integer value pop-up window and click OK.
B. You will be prompted to enter a value. Enter 5 and click OK.
11. CONTENT SWITCH THRESHOLD
You can interact with a loading page when content.interrupt.parsing is set to true. When a page is loading, the application has two modes: a high frequency interrupt mode and a low frequency interrupt mode. The first one interrupts the parser more frequently to allow for greater UI responsiveness during page load.
The low frequency interrupt mode interrupts the parser less frequently to allow for quicker page load. The application enters high frequency interrupt mode when you move the mouse or type on the keyboard and switch back to low frequency mode when you had no activity for a certain amount of time. This preference controls that amount of time. Right-click (Apple users ctrl-click) anywhere in the about:config window and select New and then Integer from the pop-up menu.
A. Enter content.switch.threshold in the New integer value pop-up window and click OK.
B. You will be prompted to enter a value. Enter 750000 and click OK.
12. NGLAYOUT INITIALPAINT DELAY
Mozilla applications render web pages incrementally, they display what’s been received
of a page before the entire page has been downloaded. Since the start of a web page
normally doesn’t have much useful information to display, Mozilla applications will wait
a short interval before first rendering a page. This preference controls that interval. Rightclick (Apple users ctrl-click) anywhere in the about:config window and select New and then Integer from the pop-up menu.
A. Enter nglayout.initialpaint.delay in the New integer value pop-up window and click OK.
B. You will be prompted to enter a value. Enter 0 and click OK.
Sunday, April 19, 2009
Tweak Windows Vista's Logon screen to meet your needs
Before you begin editing, keep in mind that the Windows Registry is vital to the operating system. Before editing the Windows Registry, you should take a few moments to back it up for safekeeping.
To begin, click the Start button, type Regedit in the Start Search box, and then press [Enter]. When you do, you’ll encounter a UAC and will need to respond accordingly.
Once the Registry Editor launches, locate the following key:
HKEY_LOCAL_MACHINE\SOFTWARE\Microsoft\Windows\CurrentVersion\Policies\System
From this key, you’ll be able to make all the following changes to the Logon screen.
Removing the shutdown button
When you are viewing the Vista Logon screen, you’ll notice that there is a red shutdown button on the lower right part of the screen, as shown in Figure A.
Figure A
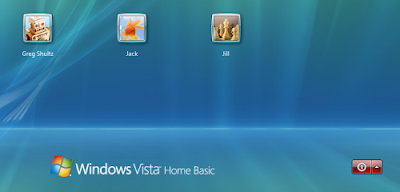 There’s a large, red shutdown button on the lower right part of the Logon screen.
To remove the shutdown button from the Logon screen, locate and double-click the shutdownwithoutlogon value. When the Edit DWORD dialog box appears, simply type 0 in the Value Data text box, as shown in Figure B, and click OK.
Figure B
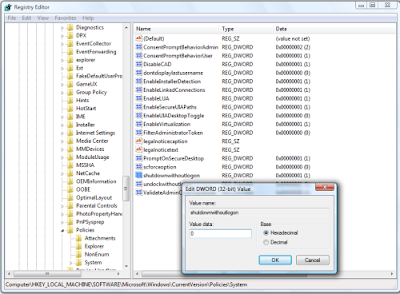 To remove the shutdown button from the Logon screen, set the shutdown without logon value to 0.
The next time you see the Logon screen you’ll notice that the red shutdown button is gone, as shown in Figure C.
Figure C
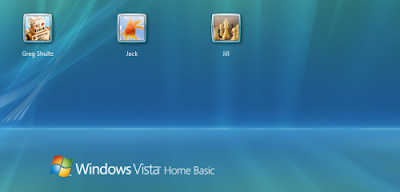 The large, red shutdown button is gone.
(Now, if I could only figure out a way to remove the Ease of Access button from the Logon screen. Any ideas?)
Adding a legal notice to the Logon screen
If you want to back up the Vista Logon security system, you may want to add a warning message to the screen that is designed to act as a deterrent to anyone thinking of attempting unauthorized access. While this type of measure doesn’t add any real protection to the system, it might be all that’s needed to prevent an unauthorized user from proceeding.
To add a title to the warning message, locate and double-click the legalnoticecaption value. When the Edit DWORD dialog box appears, type the title in the Value Data text box, as shown in Figure D, and click OK.
Figure D
 The legalnoticecaption value allows you to specify a title for your warning message.
To add the warning message, locate and double-click the legalnoticetext value. When the Edit DWORD dialog box appears, type the warning message in the Value Data text box, as shown in Figure E, and click OK.
Figure E
 You can type a lot of text into the legalnoticetext value.
Now when you access the Logon screen, you’ll see your warning message. Just click OK and you’ll see your user icon and can continue with the logon operation.To begin, click the Start button, type Regedit in the Start Search box, and then press [Enter]. When you do, you’ll encounter a UAC and will need to respond accordingly.
Once the Registry Editor launches, locate the following key:
HKEY_LOCAL_MACHINE\SOFTWARE\Microsoft\Windows\CurrentVersion\Policies\System
From this key, you’ll be able to make all the following changes to the Logon screen.
Removing the shutdown button
When you are viewing the Vista Logon screen, you’ll notice that there is a red shutdown button on the lower right part of the screen, as shown in Figure A.
Figure A
 There’s a large, red shutdown button on the lower right part of the Logon screen.
To remove the shutdown button from the Logon screen, locate and double-click the shutdownwithoutlogon value. When the Edit DWORD dialog box appears, simply type 0 in the Value Data text box, as shown in Figure B, and click OK.
Figure B
 To remove the shutdown button from the Logon screen, set the shutdown without logon value to 0.
The next time you see the Logon screen you’ll notice that the red shutdown button is gone, as shown in Figure C.
Figure C
 The large, red shutdown button is gone.
(Now, if I could only figure out a way to remove the Ease of Access button from the Logon screen. Any ideas?)
Adding a legal notice to the Logon screen
If you want to back up the Vista Logon security system, you may want to add a warning message to the screen that is designed to act as a deterrent to anyone thinking of attempting unauthorized access. While this type of measure doesn’t add any real protection to the system, it might be all that’s needed to prevent an unauthorized user from proceeding.
To add a title to the warning message, locate and double-click the legalnoticecaption value. When the Edit DWORD dialog box appears, type the title in the Value Data text box, as shown in Figure D, and click OK.
Figure D
 The legalnoticecaption value allows you to specify a title for your warning message.
To add the warning message, locate and double-click the legalnoticetext value. When the Edit DWORD dialog box appears, type the warning message in the Value Data text box, as shown in Figure E, and click OK.
Figure E
 You can type a lot of text into the legalnoticetext value.
Tracking logons
If you want to be able to keep track of logons that were made on your system, you can configure the Logon screen to display logon statistics. Right-click anywhere inside the System key and select New | DWORD (32-bit) Value. When the new value appears, type DisplayLastLogonInfo and then press Enter twice. When the Edit DWORD dialog box appears, simply type 1 in the Value Data text box, as shown in Figure F, and click OK.
Figure F
 If you want to be able to keep track of logons that were made on your system, set the DisplayLastLogonInfo value to 1.
Now when you select your user icon on the Logon screen, you’ll see the logon statistics, as shown in Figure G. Just click OK to complete the logon operation.
Figure G
 After you click your user icon, you’ll see the logon statistics on the Logon screen.
Rein in the unbound storage appetite of Vista System Restore
I recently noticed that the hard disk on one of the Microsoft Windows Vista test systems that I use quite regularly began to fill up. This seemed odd to me because while I have a lot of data on the disk, the majority of it just test data (i.e. data that I copy over from my real system just so I have something to work with). I don’t really generate much, if any, data on that system. As such, I was a bit confused as to where all the disk space was going.
Using My Computer and a couple of third-party disk space analyzers just for good measure, I discovered that I could not reconcile the disk space usage. The system has a 120GB hard disk in it, and I could account for only about 80GB of data and installed applications. So why was the system displaying a low disk space warning message?
I immediately ran the Disk Cleanup tool and set about emptying and removing just about anything that could be using up disk space: the Recycle Bin, temporary Internet files, dump files, thumbnails, log files, temp files, error report files, and downloaded program files.
That seemed to help for a while, but the problem cropped up again.
After a bit more investigation, I discovered that the problem was being caused by a configuration problem with Vista’s System Restore feature.
In this edition of the Microsoft Windows Vista & Windows 7 Report, I’ll show you what I discovered and how you can fix it. As I do, I’ll also explain how to use the Volume Shadow Copy Service Administration command-line tool, VSSAdmin.
How System Restore works
Before we get started on the technique, let’s begin with a brief overview of how System Restore works.
System Restore is designed to take snapshots, called restore points, of your system state before certain types of operations, such as installing new drivers or installing Windows updates, are initiated. That way if a problem results from those types of operations, you can revert back to the restore point and essentially recover, or restore, your system to the state that it was in before the problem occurred.
These snapshots are taken by the Volume Shadow Copy Service. In addition to taking care of creating the restore points, the Volume Shadow Copy Service also monitors data files for the Previous Versions feature.
Using VSSAdmin
In order to manage the Volume Shadow Copy Service and ultimately System Restore, you’ll use the VSSAdmin command-line tool — there is no GUI tool in Vista for configuring System Restore. In order to run VSSAdmin, you must launch an elevated Command Prompt window.
To begin, right-click on the Command Prompt shortcut and select the Run as Administrator command. When you encounter the UAC, you will need to respond appropriately.
You can now use the VSSAdmin command-line tool to investigate and configure System Restore and the Shadow Copy Service. For example, you can obtain a list of all the restore points currently saved on the system by using the command:
vssadmin list shadows
You can see how much disk space is allocated to and used by System Restore and the Shadow Copy Service system by using the command:
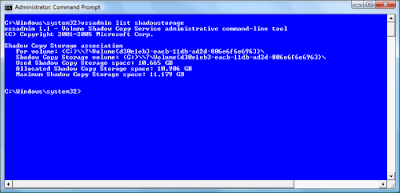
vssadmin list shadowstorage
The investigation
On the Vista system that was running out of disk space, the result of the vssadmin list shadowstorage command is shown in Figure A. As you can see the Maximum Shadow Copy Storage space settings was set to Unbounded, which means that there is no limit to the size it can grow and it was already at 40GB.
Figure A
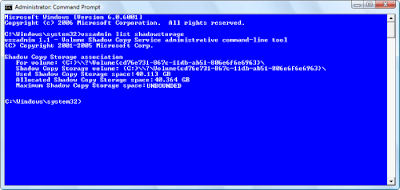 The Maximum Shadow Copy Storage space setting on the problem system was set to Unbounded.
On another Vista test system, running on an 80MB hard disk, the Maximum Shadow Copy Storage space setting was set to 11 GB, as shown in Figure B. This was a much more reasonable value. Why the value on one of my test systems was set to unbounded while the others had specific maximum values, I’m not sure.
Figure B


 The Maximum Shadow Copy Storage space setting on another system was set to 11GB.
The solution
You can reset the value of the Maximum Shadow Copy Storage space setting using the command:
vssadmin resize shadowstorage /for= /on= [/maxsize=
On my problem system, I reset the Maximum Shadow Copy Storage space setting to 15GB using the command:
vssadmin resize shadowstorage /for=c: /on=c: /maxsize=15GB
Once the operation was complete, I restarted the system, and everything has been running normally since.
Using My Computer and a couple of third-party disk space analyzers just for good measure, I discovered that I could not reconcile the disk space usage. The system has a 120GB hard disk in it, and I could account for only about 80GB of data and installed applications. So why was the system displaying a low disk space warning message?
I immediately ran the Disk Cleanup tool and set about emptying and removing just about anything that could be using up disk space: the Recycle Bin, temporary Internet files, dump files, thumbnails, log files, temp files, error report files, and downloaded program files.
That seemed to help for a while, but the problem cropped up again.
After a bit more investigation, I discovered that the problem was being caused by a configuration problem with Vista’s System Restore feature.
In this edition of the Microsoft Windows Vista & Windows 7 Report, I’ll show you what I discovered and how you can fix it. As I do, I’ll also explain how to use the Volume Shadow Copy Service Administration command-line tool, VSSAdmin.
How System Restore works
Before we get started on the technique, let’s begin with a brief overview of how System Restore works.
System Restore is designed to take snapshots, called restore points, of your system state before certain types of operations, such as installing new drivers or installing Windows updates, are initiated. That way if a problem results from those types of operations, you can revert back to the restore point and essentially recover, or restore, your system to the state that it was in before the problem occurred.
These snapshots are taken by the Volume Shadow Copy Service. In addition to taking care of creating the restore points, the Volume Shadow Copy Service also monitors data files for the Previous Versions feature.
Using VSSAdmin
In order to manage the Volume Shadow Copy Service and ultimately System Restore, you’ll use the VSSAdmin command-line tool — there is no GUI tool in Vista for configuring System Restore. In order to run VSSAdmin, you must launch an elevated Command Prompt window.
To begin, right-click on the Command Prompt shortcut and select the Run as Administrator command. When you encounter the UAC, you will need to respond appropriately.
You can now use the VSSAdmin command-line tool to investigate and configure System Restore and the Shadow Copy Service. For example, you can obtain a list of all the restore points currently saved on the system by using the command:
vssadmin list shadows
You can see how much disk space is allocated to and used by System Restore and the Shadow Copy Service system by using the command:
vssadmin list shadowstorage
The investigation
On the Vista system that was running out of disk space, the result of the vssadmin list shadowstorage command is shown in Figure A. As you can see the Maximum Shadow Copy Storage space settings was set to Unbounded, which means that there is no limit to the size it can grow and it was already at 40GB.
Figure A
 The Maximum Shadow Copy Storage space setting on the problem system was set to Unbounded.
On another Vista test system, running on an 80MB hard disk, the Maximum Shadow Copy Storage space setting was set to 11 GB, as shown in Figure B. This was a much more reasonable value. Why the value on one of my test systems was set to unbounded while the others had specific maximum values, I’m not sure.
Figure B
 The Maximum Shadow Copy Storage space setting on another system was set to 11GB.
The solution
You can reset the value of the Maximum Shadow Copy Storage space setting using the command:
vssadmin resize shadowstorage /for=
On my problem system, I reset the Maximum Shadow Copy Storage space setting to 15GB using the command:
vssadmin resize shadowstorage /for=c: /on=c: /maxsize=15GB
Once the operation was complete, I restarted the system, and everything has been running normally since.
Wednesday, April 15, 2009
Windows XP Run Commands and Shortcuts
Calc - Calculator
Cfgwiz32 - ISDN Configuration Wizard
Charmap - Character Map
Chkdisk - Repair damaged files
Cleanmgr - Cleans up hard drives
Clipbrd - Windows Clipboard viewer
Cmd - Opens a new Command Window (cmd.exe)
Control - Displays Control Panel
Dcomcnfg - DCOM user security
Debug - Assembly language programming tool
Defrag - Defragmentation tool
Drwatson - Records programs crash & snapshots
Dxdiag - DirectX Diagnostic Utility
Explorer - Windows Explorer
Fontview - Graphical font viewer
Ftp - ftp.exe program
Hostname - Returns Computer's name
Ipconfig - Displays IP configuration for all network adapters
Jview - Microsoft Command-line Loader for Java classes
MMC - Microsoft Management Console
Msconfig - Configuration to edit startup files
Msinfo32 - Microsoft System Information Utility
Nbtstat - Displays stats and current connections using NetBios over TCP/IP
Netstat - Displays all active network connections
Nslookup - Returns your local DNS server
Ping - Sends data to a specified host/IP
Regedit - registry Editor
Regsvr32 - register/de-register DLL/OCX/ActiveX
Regwiz - Reistration wizard
Sfc /scannow - Sytem File Checker
Sndrec32 - Sound Recorder
Sndvol32 - Volume control for soundcard
Sysedit - Edit system startup files (config.sys, autoexec.bat, win.ini, etc.)
Taskmgr - Task manager
Telnet - Telnet program
Tracert - Traces and displays all paths required to reach an internet host
Winipcfg - Displays IP configuration
Management Consoles
certmgr.msc - Certificate Manager
ciadv.msc - Indexing Service
compmgmt.msc - Computer management
devmgmt.msc - Device Manager
dfrg.msc - Defragment
diskmgmt.msc - Disk Management
fsmgmt.msc - Folder Sharing Management
eventvwr.msc - Event Viewer
gpedit.msc - Group Policy -XP Pro only
iis.msc - Internet Information Services
lusrmgr.msc - Local Users and Groups
mscorcfg.msc - Net configurations
ntmsmgr.msc - Removable Storage
perfmon.msc - Performance Manager
secpol.msc - Local Security Policy
services.msc - System Services
wmimgmt.msc - Windows Management
Shortcuts
access.cpl - Accessibility Options
hdwwiz.cpl - Add New Hardware Wizard
appwiz.cpl - dd/Remove Programs
timedate.cpl - Date and Time Properties
desk.cpl - Display Properties
inetcpl.cpl - Internet Properties
joy.cpl - Joystick Properties
main.cpl - Keyboard Properties
main.cpl - Mouse Properties
ncpa.cpl - Network Connections
ncpl.cpl - Network Properties
telephon.cpl - Phone and Modem options
powercfg.cpl - Power Management
intl.cpl - Regional settings
mmsys.cpl - Sound Properties
mmsys.cpl - Sounds and Audio Device Properties
sysdm.cpl - System Properties
nusrmgr.cpl - User settings
firewall.cpl - Firewall Settings (sp2)
wscui.cpl - Security Center (sp2)
Windows Environment Commands
%ALLUSERSPROFILE% - Open the All User's Profile
%HomeDrive% - Opens your home drive e.g. C:\
%UserProfile% - Opens you User's Profile
%temp% Opens - temporary file Folder
%systemroot% - Opens Windows folder
Wupdmgr - Takes you to Microsoft Windows Update
Microsoft natural keyboard shortcuts
Windows Logo+BREAK (Display the System Properties dialog box)
Windows Logo+D (Display the desktop)
Windows Logo+M (Minimize all of the windows)
Windows Logo+SHIFT+M (Restore the minimized windows)
Windows Logo+E (Open My Computer)
Windows Logo+F (Search for a file or a folder)
CTRL+Windows Logo+F (Search for computers)
Windows Logo+F1 (Display Windows Help)
Windows Logo+ L (Lock the keyboard)
Windows Logo+R (Open the Run dialog box)
Windows Logo+U (Open Utility Manager)
Microsoft Management Console (MMC) main window keyboard shortcuts
CTRL+O (Open a saved console)
CTRL+N (Open a new console)
CTRL+S (Save the open console)
CTRL+M (Add or remove a console item)
CTRL+W (Open a new window)
F5 key (Update the content of all console windows)
ALT+SPACEBAR (Display the MMC window menu)
ALT+F4 (Close the console) • ALT+A (Display the Action menu)
ALT+V (Display the View menu)
ALT+F (Display the File menu)
ALT+O (Display the Favorites menu)
MMC console window keyboard shortcuts
CTRL+P (Print the current page or active pane)
ALT+Minus sign (-) (Display the window menu for the active console window)
SHIFT+F10 (Display the Action shortcut menu for the selected item)
F1 key (Open the Help topic, if any, for the selected item)
F5 key (Update the content of all console windows)
CTRL+F10 (Maximize the active console window)
CTRL+F5 (Restore the active console window)
ALT+ENTER (Display the Properties dialog box, if any, for the selected item)
F2 key (Rename the selected item)
CTRL+F4 (Close the active console window. When a console has only one console window, this shortcut closes the console)
Remote desktop connection navigation
CTRL+ALT+END (Open the Microsoft Windows NT Security dialog box)
ALT+PAGE UP (Switch between programs from left to right)
ALT+PAGE DOWN (Switch between programs from right to left)
ALT+INSERT (Cycle through the programs in most recently used order)
ALT+HOME (Display the Start menu)
CTRL+ALT+BREAK (Switch the client computer between a window and a full screen)
ALT+DELETE (Display the Windows menu)
CTRL+ALT+Minus sign (-) (Place a snapshot of the entire client window area on the Terminal server clipboard and provide the same functionality as pressing ALT+PRINT SCREEN on a local computer.)
CTRL+ALT+Plus sign (+) (Place a snapshot of the active window in the client on the Terminal server clipboard and provide the same functionality as pressing PRINT SCREEN on a local computer.)
Microsoft Internet Explorer navigation
CTRL+B (Open the Organize Favorites dialog box)
CTRL+E (Open the Search bar)
CTRL+F (Start the Find utility)
CTRL+H (Open the History bar)
CTRL+I (Open the Favorites bar)
CTRL+L (Open the Open dialog box)
CTRL+N (Start another instance of the browser with the same Web address)
CTRL+O (Open the Open dialog box, the same as CTRL+L)
CTRL+R (Update the current Web page)
CTRL+ CTRL+P (Open the Print dialog box)
W (Close the current window)
Note Some keyboard shortcuts may not work if StickyKeys is turned on in Accessibility Options, Some of the Terminal Services client shortcuts that are similar to the shortcuts in Remote Desktop Sharing are not available when you use Remote Assistance in Windows XP Home Edition.
Run Command Shortcuts for Adminstrative Tools
AD Domains and Trusts | domain.msc |
Active Directory Management | admgmt.msc |
AD Sites and Serrvices | dssite.msc |
AD Users and COmputers | dsa.msc |
ADSI Edit | adsiedit.msc |
Authorization manager | azman.msc |
Certification Authority Management | certsrv.msc |
Certificate Templates | certtmpl.msc |
Cluster Administrator | cluadmin.exe |
Computer Management | compmgmt.msc |
Component Services | comexp.msc |
Configure Your Server | cys.exe |
Device Manager | devmgmt.msc |
DHCP Managment | dhcpmgmt.msc |
Disk Defragmenter | dfrg.msc |
Disk Manager | diskmgmt.msc |
Distributed File System | dfsgui.msc |
DNS Managment | dnsmgmt.msc |
Event Viewer | eventvwr.msc |
Indexing Service Management | ciadv.msc |
IP Address Manage | ipaddrmgmt.msc |
Licensing Manager | llsmgr.exe |
Local Certificates Management | certmgr.msc |
Local Group Policy Editor | gpedit.msc |
Local Security Settings Manager | secpol.msc |
Local Users and Groups Manager | lusrmgr.msc |
Network Load balancing | nlbmgr.exe |
Performance Montior | perfmon.msc |
PKI Viewer | pkiview.msc |
Public Key Managment | pkmgmt.msc |
QoS Control Management | acssnap.msc |
Remote Desktops | tsmmc.msc |
Remote Storage Administration | rsadmin.msc |
Removable Storage | ntmsmgr.msc |
Removalbe Storage Operator Requests | ntmsoprq.msc |
Routing and Remote Access Manager | rrasmgmt.msc |
Resultant Set of Policy | rsop.msc |
Schema management | schmmgmt.msc |
Services Management | services.msc |
Shared Folders | fsmgmt.msc |
SID Security Migration | sidwalk.msc |
Telephony Management | tapimgmt.msc |
Terminal Server Configuration | tscc.msc |
Terminal Server Licensing | licmgr.exe |
Terminal Server Manager | tsadmin.exe |
UDDI Services Managment | uddi.msc |
Windows Mangement Instumentation | wmimgmt.msc |
WINS Server manager | winsmgmt.msc |
Subscribe to:
Posts (Atom)